Scrapbook Cull: What I've Learned So Far

About a week ago, Kendell and I somehow came to the decision that we should switch rooms. He’d move into the smaller, darker bedroom for his office and I’d get the brighter, bigger room for my crafty space. We’d previously thought my current table/bookshelf setup wouldn’t fit in that room (which is bigger but only has three walls because the fourth has a built-in bookshelf). I’m not 100% sure what sparked our conversation, but it got to a point where I said “well, it must be nice to be hanging out in here with all this light,” which is funny because Kendell likes a darker room than I do. We started measuring and figured out that yep, we could make it work.

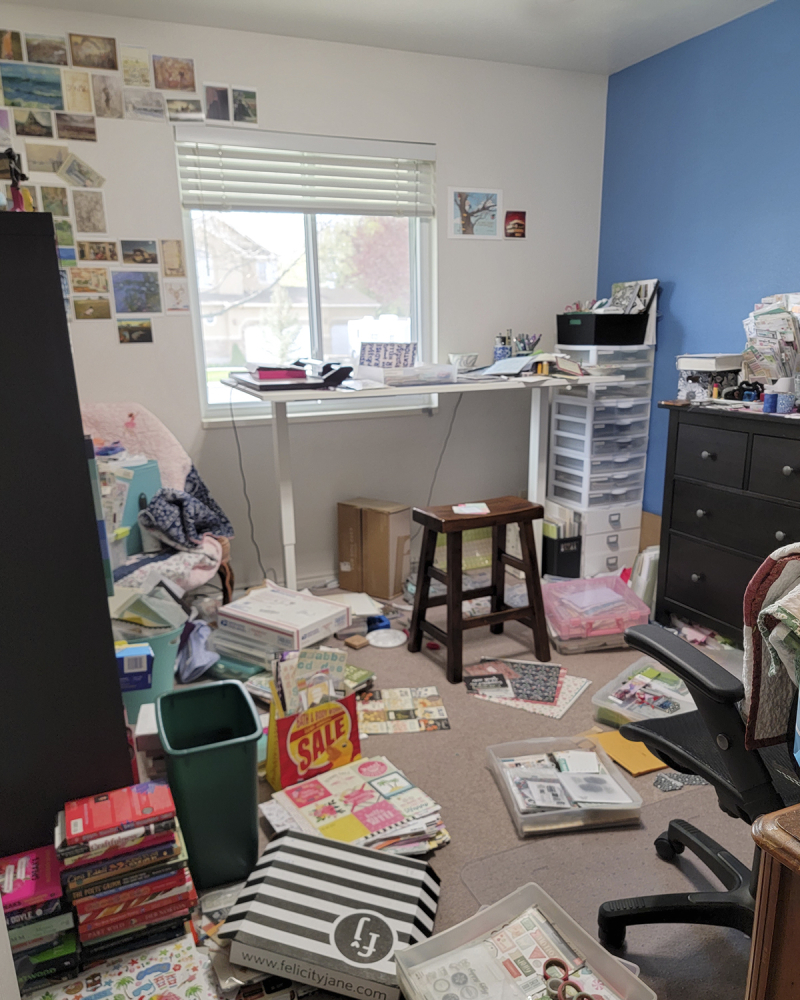
Thus engendering this mess:

Craft room reorg

I decided that I only want to move what I am actually going to use. (You can read more of how I am choosing what to keep on THIS POST.) Kendell thought this would just take a couple of days but, alas, no. I am seriously pondering every piece of paper and package of stickers. I’ve got eight different give-this-to-this-person piles going. I’ve thrown away dried-out rub-on packages (I honestly don’t think I will ever buy a rub-on again because they definitely have a shelf life, which makes me wonder how long they will actually stay rubbed on to layouts), alphabet stickers with so few random letters left I couldn’t spell anything at all, many duplicate photos, and several half-finished mini albums I’d made for scrapbooking assignments (in the long-ago days when I had scrapbooking assignments).

I started by cleaning off my main table and then going around the room clockwise so I ended up with my closet full of product drawers. I have most of my supplies organized by color, the rest by theme. Five days later, I am almost through with that closet (about six drawers to go). I intend on finishing the drawers tomorrow and then I will start actually moving stuff from one room to another. 

This is not the first time I’ve gotten rid of scrapbooking supplies or moved my crafty space. (I’ve actually had my stuff set up in each of our bedrooms at different times since we’ve lived in this house; my favorite room is the one I’m returning to because all of the kids slept there as babies, at one point or another, and it makes me happy to be in the same space their baby breaths lived.) So I know it can be a learning process, and I wanted to write down a few things I have learned so far.

  1. There are supplies I buy a lot of but use rarely. Namely, black foam alphas, white foam alphas, and anything green. Even though I set myself the goal of getting rid of stuff I don’t actually use, I kept most of these because I still know how I will use them, and it isn’t on imaginary layouts I might never get to create, but on specific topics I just haven’t done much. (This also applies to the baby boy drawer...I have very, very slowly scrapbooked Kaleb’s baby year. Not because I don’t want to, or don’t enjoy baby pages, but because I love them so much that if I hurry up and do them all, I won’t have any left to make. Please note the contrast between not wanting to “hurry up” and Kaleb’s age...he’s almost 16.)
  2. There are some photos I’m a little bit afraid to scrapbook. Not the topics themselves, but the photos. Namely: pictures from hiking and pictures from southern Utah. When the photos are of gorgeous places, what products do you use so as to add rather than detract from the gorgeousness of the location? (This is why I have all of those unused green products, by the way. Because they’d be great—I think!—with hiking photos.) Also, travel in general. I’ve done some awesome trips over the past decade but have made almost zero layouts about any of them. 
  3. I had supplies grouped in awkward ways that made it harder to find things. One drawer with travel andbeach and summer was overwhelming to find anything in. (And only in my mind do birthday, Easter, and sports supplies go in the same drawer!) So I eliminated some categories and combined others and came up with new categories. Which means I’ve also gathered travel memorabilia and notes from random spots and put them all in the travel drawer with the travel supplies. I also have a drawer of hiking supplies, which I didn’t think I could do as not many manufacturers actually make many hiking-themed supplies, aside from a random hiking boot here and there. But I guess I’ve accumulated what has been made.
  4. My scrapbooking approach must change as my life changes. I’ve mostly caught up with Christmas layouts, for example, so I really do not need the massive amount of Christmas supplies I’ve accumulated. Same with Halloween. I still have a ton of untold stories about my kids, but if I stopped scrapbooking tomorrow, they would all have a lot of tidbits of their life recorded. I think it is OK if I also scrap more about myself at this point. (While still telling their stories as well.)
  5. It is impossible to discard any Basic Grey supply. I’ve tried. I just put them back. So pretty, so unique, and now completely irreplaceable. (RIP Basic Grey)

As I have gone through this process—which I am calling a cull rather than a purge because it feels more positive—I have had some self-castigation. I’ve definitely overspent. (Don’t tell my husband I said that. I will deny it to my dying day.) But I’ve also remembered some really cool stuff I have and should USE.

I’m excited to see how my new space comes together and to start scrapbooking (and quilting! but that’s a different post) with my supplies that feel enlivened by the reduction.
Messy Craft Table as Self-Portrait

This morning my plan was to add the border to the baby quilt I’ve been working on, so I can get that one and the other two that I need to finish sandwiched and quilted. I got derailed by laundry, though, and needing a quick trip to Target for the laundry and since I’m still not driving I had to wait until Kendell had a break in his calls and then…

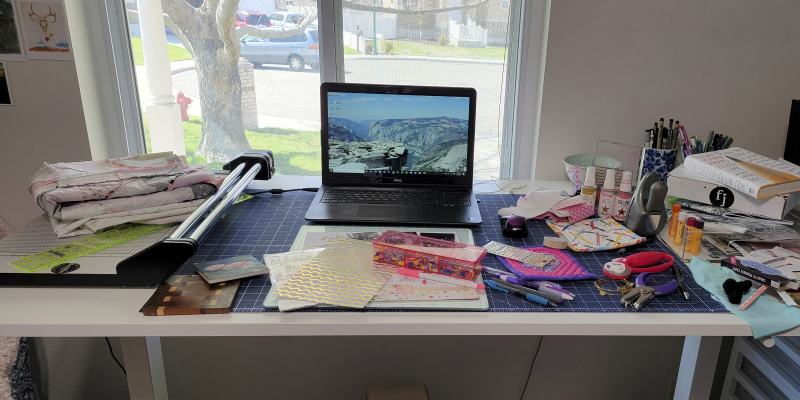
I walked into my crafty space and just kind of had to laugh. Because look at my table:

Messy crafty desk 4 8 2021

I’m not the kind of person who’s bugged by some clutter. I’m OK to work around it. But this is ridiculous…all the useable space is used up! So before I did anything, I needed to clean up my space.

But then I really looked at it, and I thought….hmmmmmm. That’s kind of a self-portrait right there, isn’t it? My desk says a lot about me, my personality, my affections, my obsessions. So before I cleaned up I snapped a pic. I know it looks like a cluttered ridiculous mess, but here’s what my table mess reveals about me (starting from the left and working to the right.

  1. I make quilts. I make baby quilts. If you are my friend or my family member and you have a baby, I’ll probably make a quilt for you. SOMETIMES I will buy the fabric but never make or actually give the quilt to you. But I still thought about it, that counts, right? It’s probably me overthinking, but the making of baby quilts is not just a shower gift for me. It is a love language that I speak to other people, a way of giving them my time and something tangible. It is because of Aunt Merle making me a baby quilt, and I can’t actually remember Aunt Merle but I can remember loving that baby quilt she made and so in essence some part of her is still here. Still remembered. Am I saying I make baby quilts to ward off my fear of death? Maybe. Don’t tell the new moms that though.
  2. My ginormous paper cutter. Kendell surprised me with this Rotatrim in 1997 or 98 and 20+ years later it still works perfectly. It felt obscenely expensive at the time but the long-lasting nature has made up for the cost. It is one of my most useful and most-used scrapbooking tools. And there on top of it is a quilting ruler, which I use interchangeable for quilting and scrapbooking.
  3. There are actually four things for placing cups on on my desk. The one I’ve used the longest is the one Elliot made for me. I think about him every day, partly because I have this beautiful and useful object he made for me. (Translation: my favorite gifts are the thoughtful and useful ones that carry some of the giver’s personality.) Also Monet’s Water Lilies, which I bought at the Denver Art Museum after seeing the exhibit. The corner is chipped because the airport security made me empty my entire carry-on bag (as has happened every time I’ve flown out of Denver) and the woman handling my stuff dropped it. Guilty of transporting art over state boundaries I guess and there’s always a price to pay for that. I’m not bitter.
  4. I didn’t think I would love having a laptop. I like the sturdiness of a desktop. But since Kendell’s been working from home (for the past four years, folks, don’t complain about your year-long time of never having any solitude or peace or quiet until you’ve done it for almost half a decade) and he uses the desktop, I’ve fallen in love with my laptop. Poems, essays, blog posts, political diatribes, editing photos, chatting with friends, writing scrapbook journaling and in my journal and bits & pieces of unfinished stories and…I use it a lot. So much so that I’ve worn out the left arrow key. (I don’t know why it’s that key.) Yes, I do have a purple mouse.
  5. The last scrapbook layout I finished, some supplies I still need to put away, my box of pins (unapologetically pink), a pile of purple pens. Just pretty and fun and colorful stuff I use.
  6. A couple of the border strips. I’m not 100% sure I can make the vision of this border actually work, but I’m going to try! I’ll let you know!
  7. My surgery amulets. I like Alex + Ani bracelets. During my recovery I wore those two gold ones. One has a seashell and it reminds me of the moment on the beach at Carmel when I had to admit to myself that I couldn’t muscle my way through this injury but would probably have to have it fixed. I cried a little but then I felt a deep sense of peace. Maybe the ocean waves were fooling me, but I felt like it would eventually be OK. The other has a charm of a gymnast doing a pose similar to dancer’s pose. I wore that one to remind myself that I have been strong and flexible in the past and those traits will help me be strong and flexible again. I’ve worn them every day since my surgery.
  8. Burt’s Bees. My favorite line stamp for journaling. My only real “mixed media” supplies that I actually use (the Heidi Swapp Color Shine spray). A box of new stuff from Felicity Jane, one of my favorite scrapooking companies. A book I’ve partially read.
  9. A headband and a scrunchie. Head bands are starting to show up around the house again, proof that I am doing more outside movement. I have some longstanding and fairly deep Forehead Issues, friends. It’s a story. I can’t stand to have my forehead exposed to sunlight. So I have a, well…a generously-sized collection of Bondi Bands. I keep them handy in all the spaces just in case.
  10. That clear tray holds new photos and supplies I want to use ASAP. The smaller pink one holds scraps I’ll use to make cards. As soon as I make cards. I still need to make, write, and send thank you cards to the many people who helped after my surgery. Three months later isn’t too late is it? 

I had to slightly clean off my desk just to write this post. Now I’m going to put on the border. Except I just heard the laundry machine ding…


Patchwork Forest, or How My Crafty Ambitions Spiraled Out of Control Once Again

Ever since I saw Amy Smart’s Christmas quilt called Patchwork Forest a couple of years ago, I have wanted to make one. (Seriously…look at her blog post and then search the hashtag on Instagram and tell me you don’t want to make one too?) But I’ve talked myself out of it because seriously, I don’t need another Christmas quilt. And because sometimes if I start a quilting project in December I let it consume me and I know my family hates it when that happens.

But I never stopped wanting it.

This November I was admiring some Christmas fabric at the fabric store, thinking about that pine forest quilt. And how, to make it scrappy enough, I would have to buy a lot more Christmas fabric. And how I didn’t need to spend a whole bunch of money on Christmas fabric.

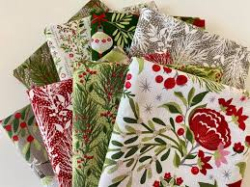
But also how gorgeous that fabric was. It’s called Naughty or Nice and it’s designed by Basic Grey, a designer I’ve loved since they made scrapbooking product (wish they still did!):

Moda naughty or nice

(I mean…could YOU resist that? Especially that floral???)

I’ve also been thinking a lot lately about low volume fabrics. About making a quilt with low volume fabrics. (Because I totally need another quilt, yes!)

And somehow, right there in the fabric store, my thoughts, ambitions, desires, and fiscal responsibility combined into an idea.

What if I just made a few trees, with the scraps I have saved from previous Christmas projects?

And what if I just made a few more trees, with the fabric I love this year?

Then next year, when certainly there will be more Christmas fabric I love, I could make a few more squares.

And it could be my thing I do in December, just make a few squares, until I have enough for a whole quilt.

Perfect, right!?! I could just make a few, without spending all of this December making a quilt.

And this year I could make some low volume ones, because certainly by next Christmas my creative itch will be different.

It was a perfect, perfect plan.

Except.

When you make the pine tree squares, you make two reversed images (or four, depending on how many you cut at once). So one square has fabric A as the background and fabric B as the tree, and the second square is the opposite.  And there was something in my scrappy-makes-me-happy nature that rebelled against that. I wanted all the trees to be different.

And, yeah.

It spiraled out of control from there.

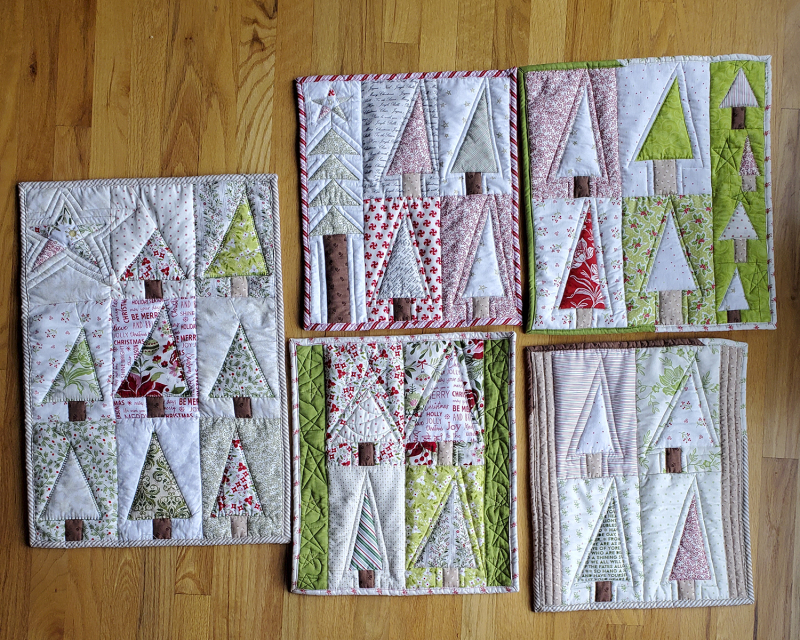
Because I had the reversed squares, I thought well, I’ll just make a few little gifts with the extras. And that turned in to five Christmas potholders

Patchwork forest hot pads

(the one on the left is mine; I made that one first, before everything spiraled out of control, and decided I didn't love how big it was, so I made the others all slightly different so they're not quite as large)

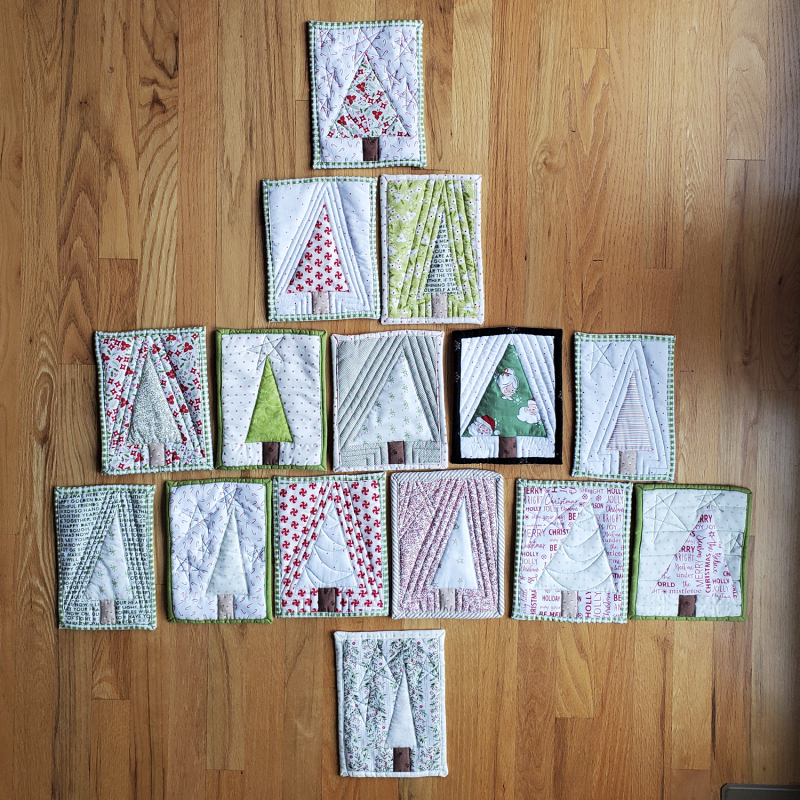
and more than 20 Christmas mug rugs:

Patchwork forest mug rugs

(Not all of them are pictured because I left some in the dryer and didn't notice until I'd packaged the rest up.)

And then Becky sent me some of her scraps so I made a few more squares (what will I do with the reverse duplicates? Because I am 100% sure my current friends and family have enough potholders and/or mug rugs. Should I try to make more friends so I can have more people to make stuff for???)

I totally did NOT make my goal to not get consumed by a quilting project.

At all.

Most of December my crafty space was covered with bits & pieces of patchwork trees in various forms of "finished." But I learned how to make them pretty quickly, and also how to cut them so they all look a bit different, and even what to do if I didn't have a big enough scrap to make two squares. Also I discovered, right at the end, that making them drastically different heights is fun. I'll use all that knowledge next year!

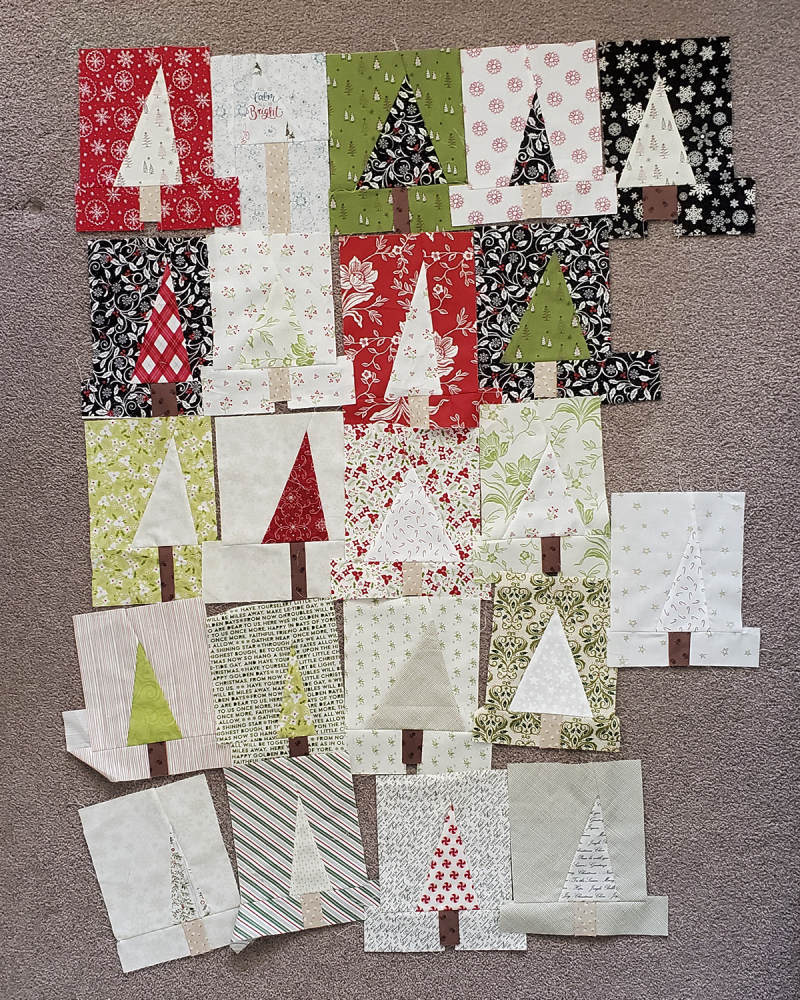
Before my surgery, I made sure that all of my Christmas sewing projects were cleaned up—extra fabric boxed up and the squares packaged carefully. I have 22 squares that will eventually go into a quilt—and, ironically enough, none of them made with that original floral I love so much! (It's OK. I noticed that when I was putting them away, and I still have some left.) I'll square them all up when I'm ready to sew them all together.

Patchwork forest 2020 squares

And, I confess…I’m a little bit excited to see what fabric I can get next year to make more trees!


Corona Virus Masks: My Process Notes on the A.B. Mask Pattern

I have finally started making masks! I don’t know why I didn’t start making them sooner; it’s not as if I don’t have fabric for it! I even prewashed and dried fabric that I thought would make appealing masks. And then Colorado, where Haley lives, started requiring people to wear masks outside so then it was a necessity! It still took a few days to get started because A—I was sick for a few days and B—I was kind of intimidated. In quilting, it is sometimes easier to hide mistakes than it is with clothing and while yes…I’ve sewn dozens of quilts and more than a few pair of pajamas, I wasn't sure my quilting skills would be enough to make a little piece of clothing.

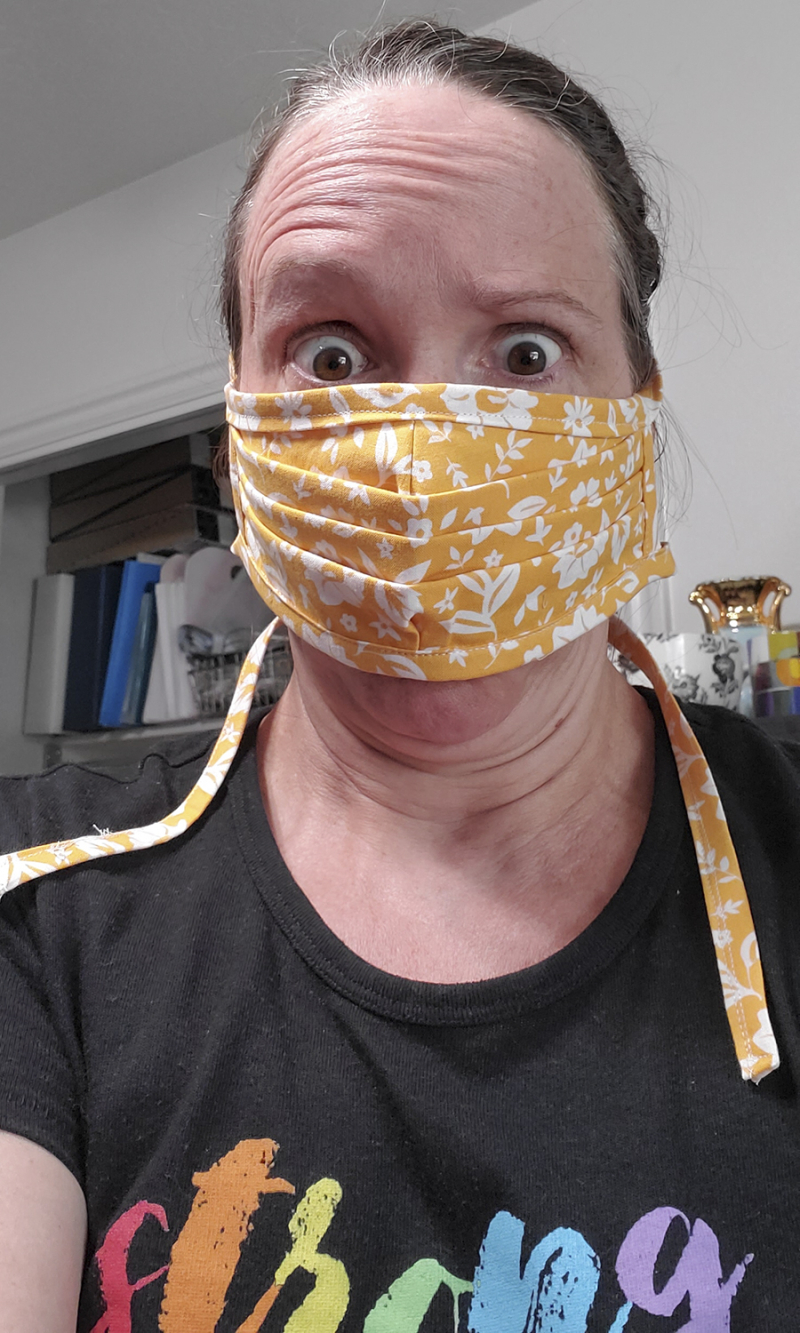
Corona masks panic
Please: Allow me to caption this photo. This is not me making a goofy face. This is me PANICKING. Same thing happens when I put on a snorkeling mask. Low-key panic because I can't get enough air. Happy to make the masks. A little bit freaked out if I actually have to wear one.

But today I decided: enough. I’ll just try one and see what happens. What’s the worst thing that could happen? I mess up and make something unwearable out of a piece of fabric?

That is acceptable risk!

There is no 1/4 inch elastic to be found anywhere near me, so I went with this pattern:

A.B. Mask for a Nurse by a Nurse

It is designed to be worn either just on your face or over an N/95 mask. It uses ties instead of elastic and two layers of quilting cotton. It seems intimidating because there are a lot of steps and it looks complicated…but really the steps are well-written and make sense if you follow them carefully.

And it was really pretty fun to make!

I know there are a million mask tutorials floating around right now and I’m definitely not the person to write another one (remember: my clothes-sewing skills are pretty unremarkable).

But I do have some notes I thought I would share. These are just notes I made as I went through the steps, and maybe they will be helpful for someone else who is also making the same pattern.

So here are my notes on each step. You can also download a PDF of the notes at the bottom of this post. And if you are thinking about sewing masks, my biggest advice is this: just do it. If they aren’t perfect, who cares? Have fun. Use bright fabrics or fun fabrics or whatever you think fits someone’s personality. If you don't have big enough pieces of fabric, use a different color for the ties. Mostly, don’t get too worried about your mistakes. Perfection isn’t the point, right? It’s protecting and caring for each other!

First things first: before you start making masks, you should preshrink your fabric. Wash it in the hottest water your washing machine has and rinse twice. Wash light fabrics separate from darks. Use a color catcher because that hot water will stream out a bunch of dye. Dry on hot, too. Trim the strings and then iron. In theory the masks should be washed once a day so you want to get the shrinking done first.

Also, if you have a fabric marking pen or pencil, find it. It'll come in handy!

Notes correlate with each step of the original pattern and are named the same thing as the patterned named them, for clarity.

  1. Print the pattern. I had no problem with this, except I should’ve printed on cardstock instead of printer paper, just for durability.
  2. Fold fabric. Quilting cotton stretches more on the width side (selvedge to selvedge) than it does on the length size (cut edge to cut edge), so if you are using odd sizes of fabric, see which side stretches the most, and fold so the stretch goes across the width of the mask, rather than the height.
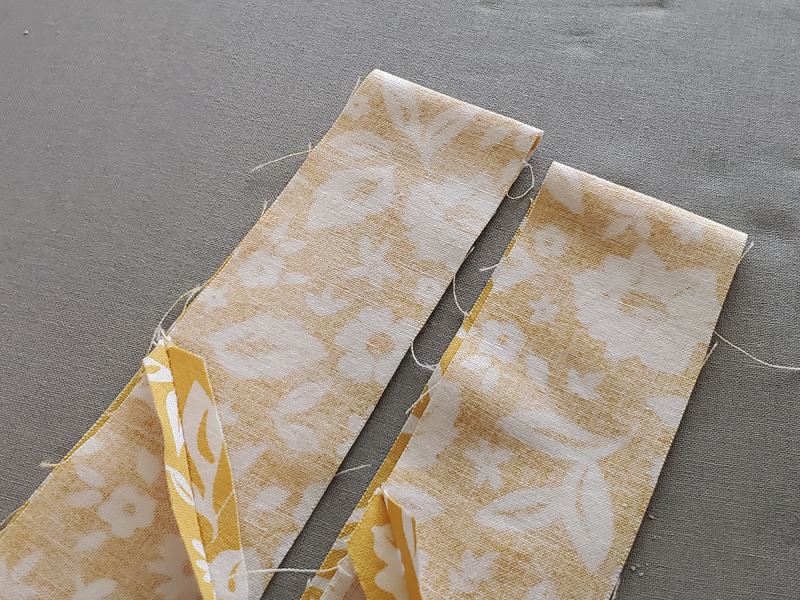
  3. Cut binding and ties. I cut my binding strips 1.75 inches instead of 1.5. I know…a quarter inch doesn’t seem like that much but for me it made it much easier to make the ties. Also, if you can use larger yardage so you can cut width of fabric strips, it does make it easier!
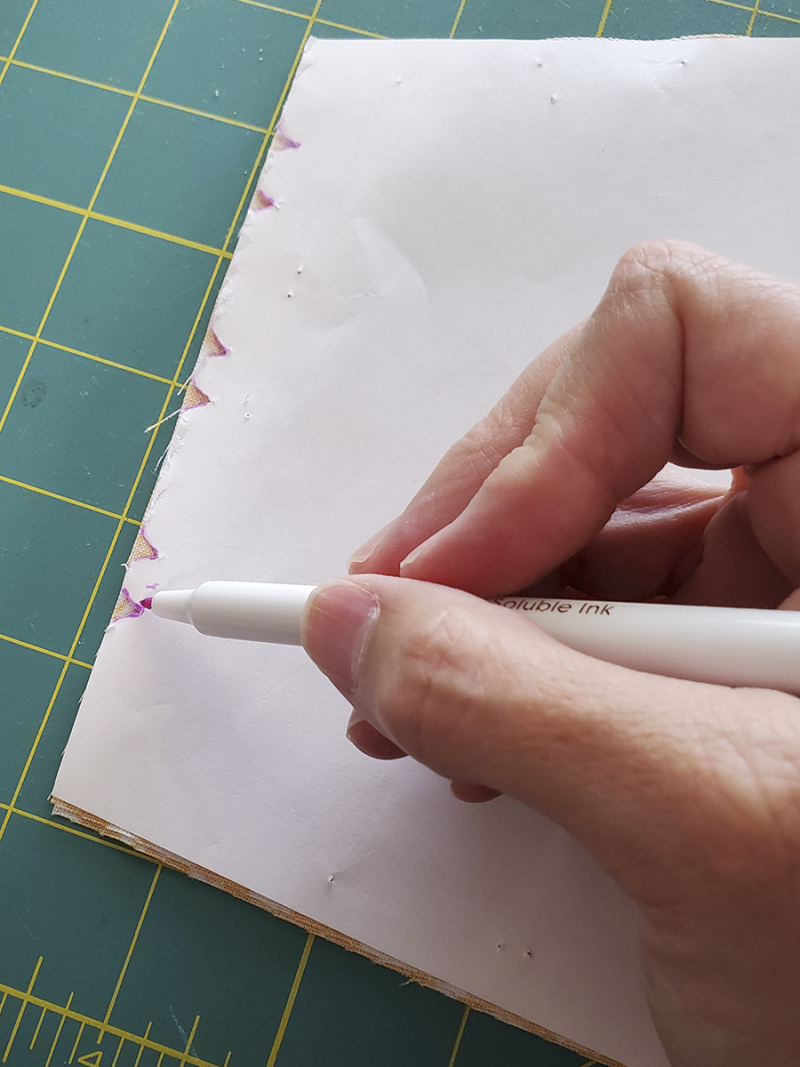
  4. Refold and cut mask face. I folded my fabric twice so I could cut four pieces at once. You can use scissors or a quilting ruler and a rotary cutter, up to you. I skipped the step of cutting out the notches. I marked it with a marking pen instead. Corona masks mark the notches
    Also, I have no idea what the difference is between a “taco” style fold and a “burrito” style fold…tortilla shells are all round.
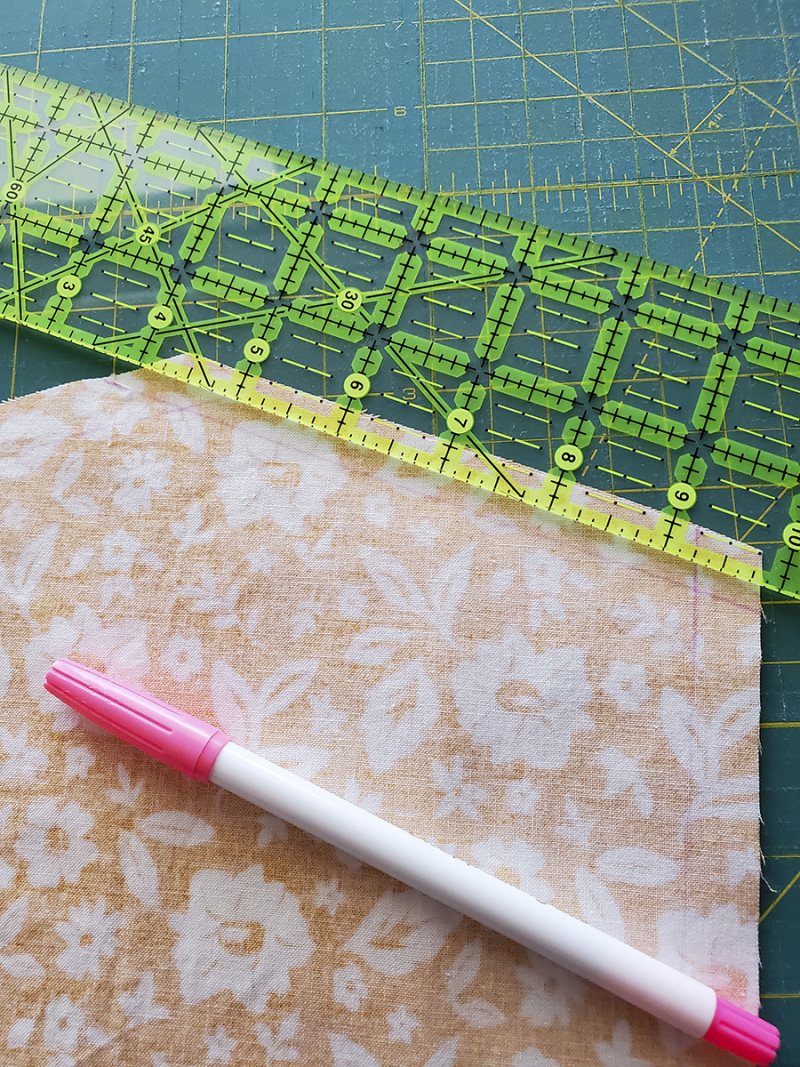
  5. Stack and sew. I have a hard time knowing exactly where to turn at the points, so I just marked a line 1/2 inch from the edge. Corona masks half inch marks
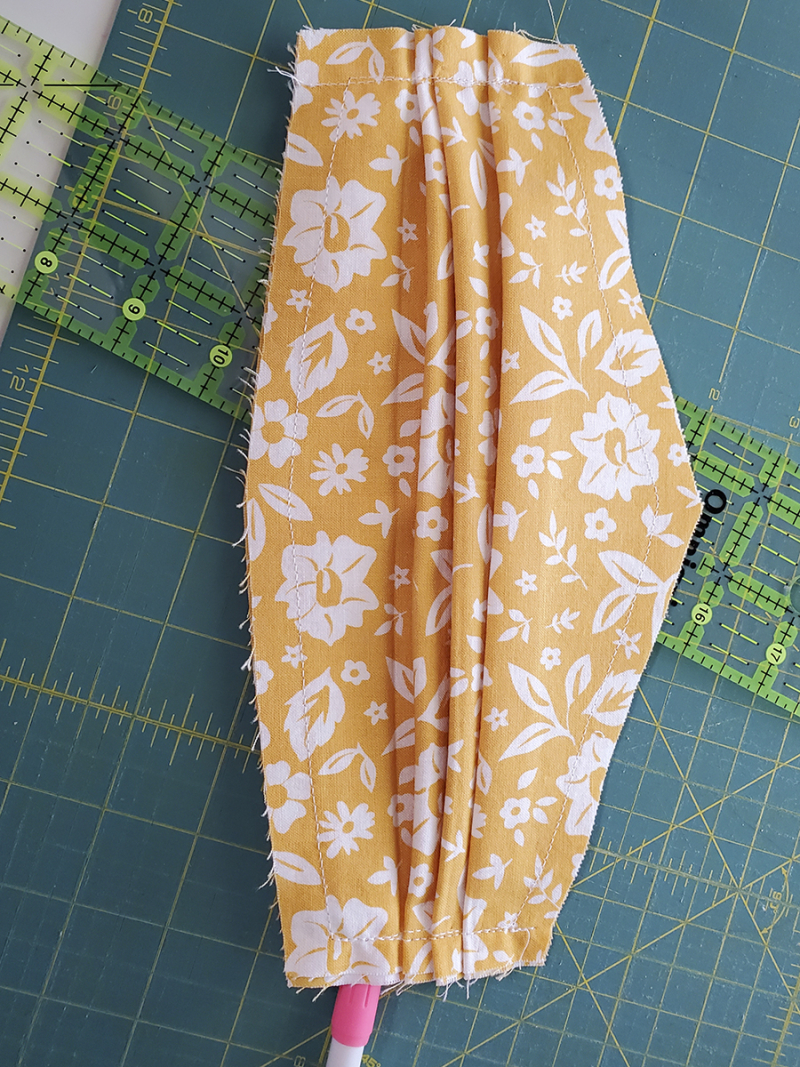
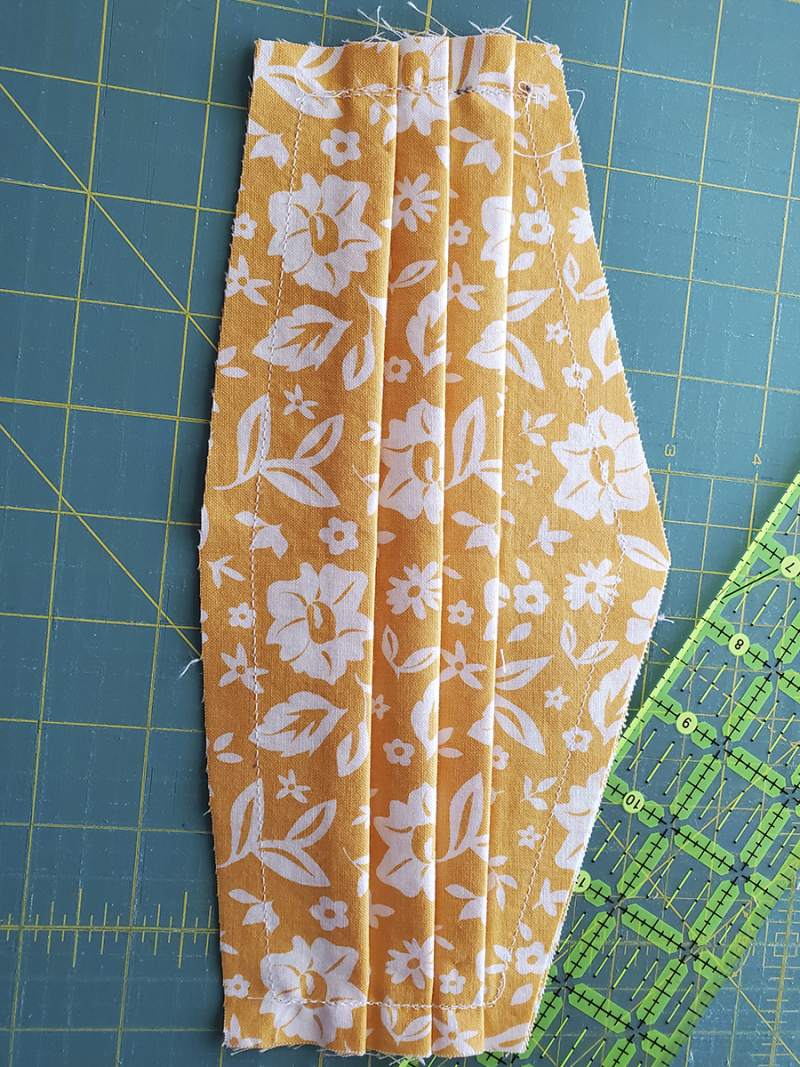
  6. Iron in pleats. I have no idea if I’m doing this step right. I THINK the fold should go up, toward the top point, but if you look at the picture of the folded pattern, it seems like they Corona masks pleats down
    point down. I’ve made it both ways…I continue to think the fold goes up. But I am happy to be corrected if I’m wrong. UPDATE!!! I found an updated version of the tutorial that states Corona masks pleats up
    "Pleats should be facing downward when looking at outside fabric of mask face." OK, got it wrong! Luckily I've only made a few so far. Maybe no one will notice? The updated version also includes instructions for a pocket for a wire. I haven't tried it so I can't speak to that part of the process, but HERE is the updated version.
  7. Sew pleats in place. Careful not to hit the pins with your sewing machine needle. Just saying.
  8. Mark and sew darts. When you sew the darts in, use the denim stitch on your machine. This is the stitch that does three stitches close together; on Bernina machines it is stitch #6.
  9. Trim excess. The tutorial photo shows these cuts being made with pinking shears. If you don’t have those, regular scissors are just fine! (I might really now want to buy a nice heavy pair of pinking shears. My mom used to have a pair that fascinated me when I was a kid. Wonder what happened to them.)
  10. Prepare the binding. If you cut width-of-fabric strips in step three, you don’t have to sew seams! Also, the smaller pieces (the one you cut in half) don’t need to be 10 inches, only about 4 inches long.
  11. Attach side binding. Sew toward the folds of the pleats to avoid sewing them down the wrong way.
  12. Finish side binding. When you sew it down to the front, again sew toward the pleats; that way your presser foot doesn’t get caught in the folds. Try to make sure the fabric edge covers the stitching lines you already stitched (also, if it doesn’t, don’t sweat it).
  13. Attach top/bottom binding. Fold the binding strip in half (end to end) and iron the fold. Then, line up that fold with the dart from step 8. This way your ties will be even.
    Corona masks folded binding
    I had to piece these binding strips together out of scraps because I calculated wrong. This is how I know it is faster to cut them from the width of the fabric!
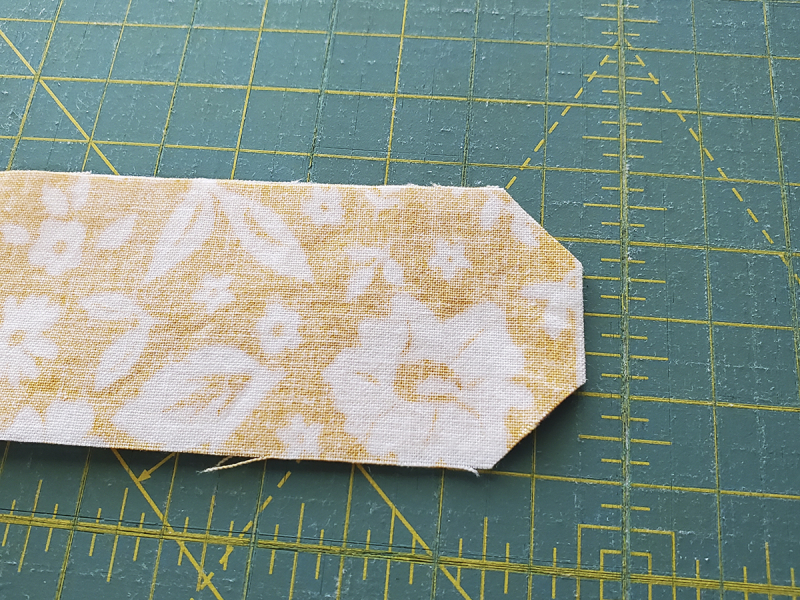
  14. Finish top/bottom binding and ties. If you folded in half on step 13, you can skip trimming the ties to make them even, as they already will be. However, I trimmed the corners off the edges of the ties because it makes sewing the ends easier.
    Corona masks clipped ends
    Fwew. This close up makes me realize I am about ready for a new cutting mat...This is the last birthday gift my mom gave me, though, so I just keep using it even though it's bumpy...

    When you sew the binding strips on, make sure to back sew once over the dart spot, just for added strength. Take this step slow at first, because it’s kind of tricky to get such a small strip in the right spot. Double check that you didn’t miss sewing both edges once you’re done; if you did, just sew it again.

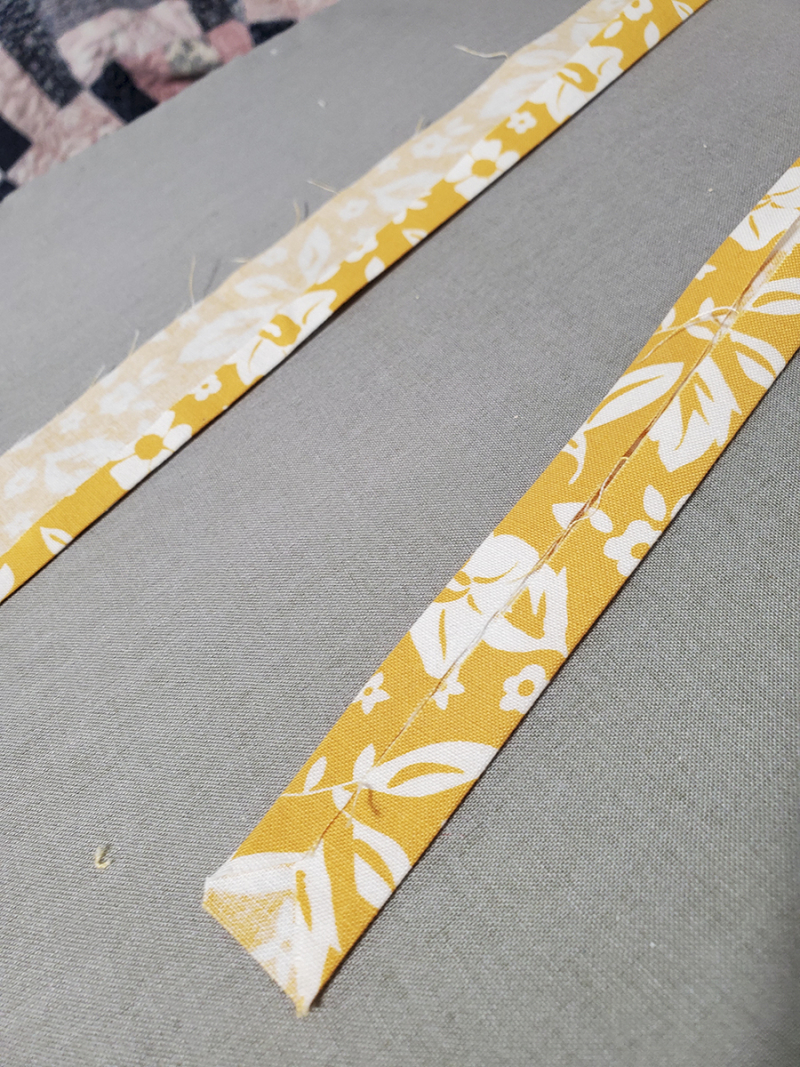
Alternate version of the clipped ends, this time folded: Corona masks folded binding ends better

The first mask I sewed took me almost 45 minutes from start to finish. By the third I was down to 30 minutes!

Download Notes on corona masks.

Let me know if you are sewing masks, have questions about sewing masks, or are also, like me, utterly panicked at the thought of wearing masks...

Happy sewing, friends!


Christmas in...March?

One of the post-holiday, survive-January traditions I’ve established is to scrap the previous December’s photos in the following January. (So…I scrapped December 2016’s Christmas stories in January of 2017.) But at the end of December 2017, my mom got really sick. And then through most of 2018, she was ill, in and out of different facilities, and she didn’t actually make it back home until October of 2018. Then she passed away in January of 2019, and the process of cleaning out her house and settling her estate (not to mention grief) took up much of that year.

Also Kendell had knee surgery in February 2018, and then he started working from home, and I had whooping cough in the middle of my marathon training, and somehow in all of that mess, scrapbooking just kind of fell by the wayside.

But it has always felt important to me to keep the Christmas stories scrapbooked. I’m not sure why Christmas feels so important to me, except for the fact that there are always great stories to go along with the holidays, and because it’s the time I feel strongly connected to both my own family and my own history, and because I wish I had more photos and stories from my childhood Christmases.

Or it might just be the fact that Christmas supplies are pretty fun to use.

Christmas in march

So even though it’s March and I didn’t do any scrapbooking at all in January (but I made several quilts and got acquainted with my new sewing machine), I’m going to use the next week (and, let’s be honest…maybe all the way into April) to scrapbook some stories and photos from 2018 and 2019.

If you’d like to join me, just for fun AND to relieve some of that COVID-19 stress, here’s a list of challenges:

  1. Write your journaling in the form of a letter.
  2. Scrap some photos you’ve had printed for more than 5 years.
  3. Use an alphabet stamp to create your title.
  4. Combine an old product and a new product on the same page.
  5. Use a non-Christmas-themed supply on a Christmas layout.
  6. Make a layout with FIVE or more puffy stickers, THREE or more washi taps, and TWO or more different patterned papers.
  7. Combine silver and gold on one layout.
  8. Make a double-page spread.
  9. Make a layout about yourself.
  10. Make a layout using non-traditional Christmas colors.

You can use all the challenges or some. You can make one layout or 27. You can even just print out your photos and put them in your photo album if you don’t make scrapbooks. You could finish up your December Daily or Journal Your Christmas or however else you document your holidays.

If you play along and want to share, use the hashtag #christmasinmarch2020 so it is all grouped together. I’ll be sharing here and on my Instagram, which is @amylsorensen. Hope you’ll join in!


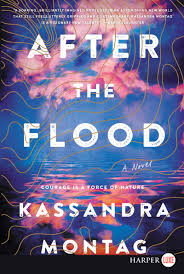
Book Review: After the Flood by Kassandra Montag

I felt a resistance in my bones. A knowledge that some choices are places and some places are where you cannot live. I had to go where I could live. I had to finish what I started and to keep stretching toward a future I had no right to believe in.

After the floodAfter the Flood by Kassandra Montag is a post-apocalyptic novel. It takes place about 100 years into the future, when the environment has degraded so much that the oceans have overtaken the earth, and the only land still above water are the higher elevations, places that used to be mountaintops that are now crowded with people. Myra and her daughter Pearl are lucky because they have a boat, which Myra’s grandfather built before he passed away. He also taught her how to fish, so she is able to provide for herself and Pearl. They live a fairly isolated existence, spending weeks at sea and only coming in to port to trade fish for supplies. When Myra discovers that her other daughter, Row, might still be alive, however, her circumstances start to change. Row was taken when Myra was pregnant with Pearl, by her father, back when the water was still rising but people could still mostly live on land, and Myra has never stopped missing her.

This knowledge gives Myra a reason to start seeking out connections with people who might be able to help her. She is fairly certain that Row is living in a settlement called The Valley, which is in Greenland, and as everything else east of the Rockies is underwater, this is far more sailing that her small boat could manage. She will need a larger boat, people to help her, a large stock of supplies. And there’s the problem that The Valley is controlled by a group of raiders called The Last Abbotts, who are fond of snatching teenage girls for their breeding ships. She cannot do this on her own.

The story winds out from Myra’s need for a solution to her problem, and as the tries to figure it out, we readers go along with her in the brutal world she lives in. I know you’re likely thinking of the movie Water World, and there is a hint of that, but it’s less campy. The world building makes the bleakness of the ruined world feel viscerally real and miserable, and yet, in a sense, it is a novel about the relationship between a mother and her daughter that just happens to be set after an apocalypse.

Since this genre is one of my favorites, I enjoyed a lot about this book. However, in the middle section it got bogged down by doing something that many other post-apocalyptic stories do: exploring human nature with a sort of certainty that a vast majority of the population would become manipulative, lying, violent people. This leads to Myra being able to trust no one, because she isn’t sure who is really reliable, while at the same time putting people (including Pearl) at risk because of her distrust. (The Walking Dead TV show does this ad nauseam and it frustrates me; maybe I’m thinking too highly of people but I think the majority would remain ethical.) It’s not so much that Myra is an unreliable narrator, but that in her mind she is doing the good, right thing while not trusting that anyone else is good or right, but she is actually harming them. (And thus neither good nor right.) She nearly becomes malicious. I was *this close* to not finishing the book because of this section. I told myself I would read for half an hour more, and if I were still frustrated I could move on.

She finally redeemed herself, though, so I continued.

I galloped through the last half, in fact. There are some unlikely plot devices that annoyed me a little (I don’t want to give any spoilers) and some things that felt predictable, but overall I am glad I stuck with it and finished this one, mostly for how Myra changes. At the end she realizes that “you must become someone you hadn’t had to be yet.” I think this resonated with me because it is a change I am trying to make in my life. Letting myself change to become who I need to be but haven’t become yet. Actually, it’s not really “letting,” it is pushing for that change. Trying to make it happen, to knock down the things that have been holding me back. Like Myra’s journey, this is long and difficult and it requires me to find and make connections I can’t even imagine at this point.

Did After the Flood change my life? No. But it gave me a little bit more courage, and that is much needed so I will take it.


Goodbye July!

I can’t believe July is already over. We are still in the heat of deep summer here, and honestly, July isn’t my favorite month. It’s hot and almost no flowers are blooming and even the grass just seems drained.

But if July ends, then it’s August. And if it’s August, can autumn be far behind?

Time, though, moves too swiftly, so I’m trying to savor summer before it ends. I’ve tried since Kaleb got out of school, in fact, to just enjoy the days, even though they’re hot. One thing that’s helped is that this year I’ve mostly abandoned trying to wear shorts. I just never feel comfortable in them. I’ve worn a lot of dresses and a LOT of running skirts and yeah, my elephant knees are exposed but I’m just so much more comfortable this summer. I didn’t post on Instagram every day for 31 Days of Skirt, but I did actually wear Skirt Sports every day!

Heat aside, July was a pretty good month. And before I turn my calendar over to August, I wanted to write a recap.

Solstice to Equinox Streak:
I exercised every day this month, except for the Saturday I was sick. I didn’t do cardio every day; on some days I lifted weights or did resistance training for a half hour. I had a little exercise epiphany: there is almost always time. One day I went for a walk at 1:00 in the afternoon, when it was blazing hot, but I wanted to get it in. So I went to the shadiest part of a path by the river and I got it in. Several nights I did my resistance/weights at 9:00 p.m. But committing to the streak has helped so much, not just with my consistency but with my mindset about exercise. I can really do it every day. And while I have yet to see any weight come off (it actually is continuing to bulge around my belly…I have an appointment with my doctor next month because I’m so frustrated by this!), I feel like I am stronger.

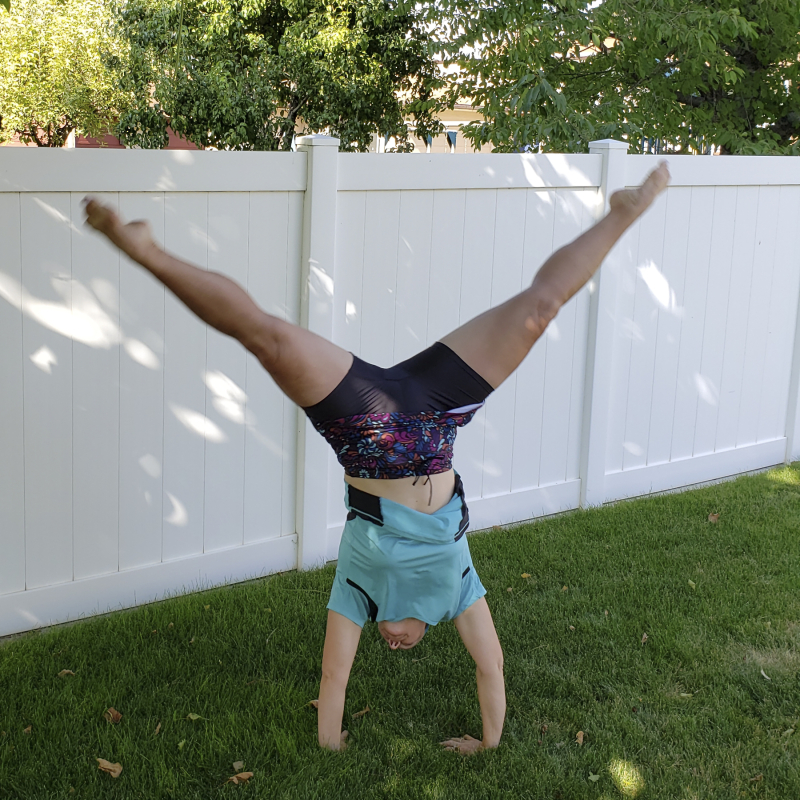
I added cartwheels to my workout strategies. I know: that sounds totally weird, and is a cartwheel really a workout? Surprisingly, yes. More of a plyometric thing, but a simple cartwheel asks a lot of your upper body, your core, and your flexibility. Plus it’s just so fun! I visited for a little while one night with my niece and her daughter, who was trying to do ariels in the grass. My body totally remembers how to do them, how it’s not really about the speed you put into it but learning how to swing your arms correctly. I gave her some pointers, and she said “but you can’t do ariels Aunt Amy!” and I said “not anymore, but I can still do a pretty good cartwheel,” and she said “NO WAY! Show me! I think you’re too old!” and so when I was done holding her new baby brother I did a cartwheel for her. Never too old!

Cartwheels

I also achieved a milestone this month that I haven’t done in two years: I had a 100-mile month. 103.7, to be exact. (To compare, I ran 90.5 in June and 75-ish in May.) And, I know: that’s not a lot to many people. Lots of runners have 100 mile weeks! But for me, it is a little reward to see my count for the month go over 100. Even last summer when I was in marathon training I never had a 100-mile month (whooping cough!). It feels like I accomplished something. Not all of those miles were running, but that’s just fine, because I also hiked a lot!

Running:
I ran a total of 50 miles (it’s actually 49.98 but I think I can round up). I had my longest run since my marathon, 6.5 miles around where I live. I had the fastest mile I’ve had in a long time, 8:48. (Again…I know that’s not fast in comparison to many runners. But it’s fast for me.) And, guess what?

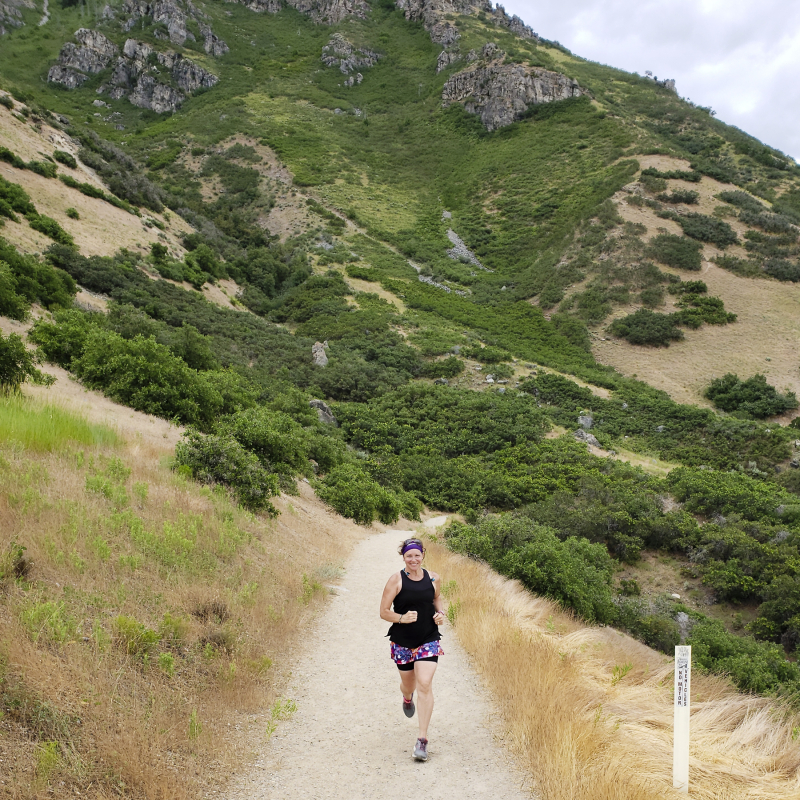
I TOOK UP TRAIL RUNNING!

Trail running

Well, maybe “took up” is too intense. I started trail running. I didn’t buy any trail running shoes so I don’t feel like I can call myself a “trail runner” yet. I was cautious and I went on very safe trails. But I just decided one day: I want to run trails too. (A longer blog post is coming on this topic.) I did two trail runs and I’m really itching to do more.

Hiking:
Big Springs with friends twice
My friend Wendy and I got out three times for hikes in the foothills.
Kendell and I together: Great Western Trail, Scout Falls and part of the TImponooke Trail (until the snow got too risky), Buffalo Peak, Rock Canyon, and Silver Glance Lake. We are up to 28 hikes together this year. I’m hoping we can make it to 50 but we’ll see.

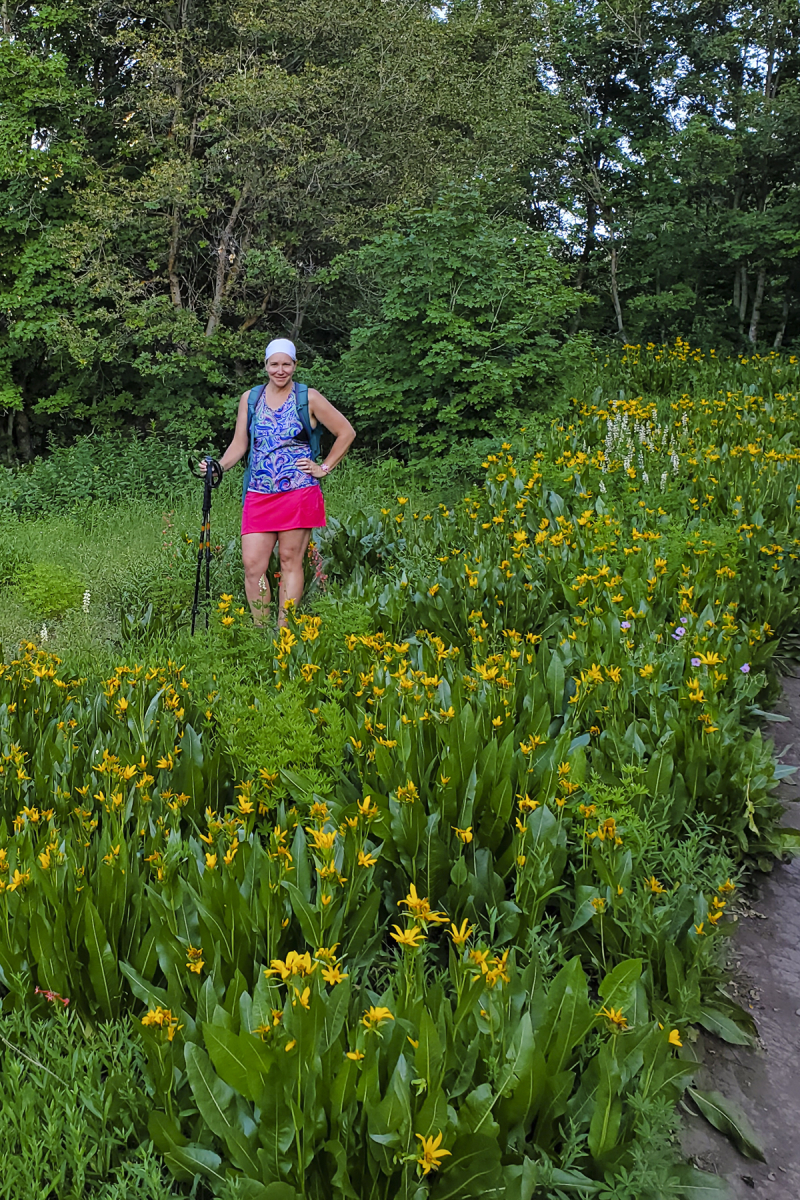
I am more in love with hiking than ever. The best thing this year is the wildflowers. They’ve been amazing from all the snow we’ve had! I just wish that I were a better photographer and could capture images that communicate how beautiful they are. But instead of carrying my big camera to photograph the flowers, I have tried to focus on being present and fully admiring the meadows.

20190719_200502 wildflowers buffalo peak 4x6

Family:
I had a couple of conversations with my kids this month that helped me get rid of some unnecessary guilt I’ve been carrying for a long, long time. Well, maybe the guilt wasn’t exactly “unnecessary,” but these two conversations just helped me to see my choices in a different light. My heart feels so much lighter.

I took Kaleb to swim in a little local pond this month, with some of his friends. He loved it. I had taken him there five years ago, when he was only 9, and I had to pull up my pictures of that day. It was amazing to see how much he has changed. (Sometimes I just have to stop thinking about how utterly strange it is that Kaleb, who was the baby I waited the longest for, is becoming a person. Even though he’s been a person (by which I mean, not a baby) for a long time, it still just sometimes hits me hard. I waited and prayed for him for so long, and then, BAM, all of a sudden he’s grown up. I had a lovely time relaxing on the grass by the pond, reading, but I got so fried on my legs. Three weeks later, they are still so tender and itchy.

Kendell and I had a fun date night when we had to drive north to pick Kaleb up from Lagoon, an amusement park about 90 minutes away from us. We brought Kaleb and his friend some pizza for dinner, and then he and I went out to eat, went shopping, and then saw The Lion King. We haven’t done enough dating in the past little while. We hike together a lot but it was nice to get out and do something a little bit different.

I got to meet my two newest great nephews. I just love babies and am so happy they are here safely. I love that both sides of our family continue to grow.

Hobbies:
While I managed to buy a lot of new supplies, I didn’t ever get around to making any scrapbook layouts this month. I haven’t, in fact, made a scrapbook layout since February or March. I’m not really sure I can explain why, but this is the longest I’ve gone without scrapbooking since I picked up the hobby in 1996. I scrapbooked as a mom with young kids, as a mom with young kids working on her degree, as a mom with young kids doing student teaching and then being a teacher. I scrapped around Kendell’s many surgeries. I scrapbooked while I stayed up late waiting for teenagers to come home from dances and jobs and dates. It’s been a central part of my identity for as long as I’ve been an adult. Kendell working from home has something to do with it, as does the process of cleaning out my mom’s house. (By scrapbooking am I just creating a huge burden for my kids to deal with when I’M dead?) Some of it is that I feel like all the pictures of my mom’s that I need to scan are hanging over me, a project that is zapping all of my creative energy. Some of it I don’t understand. I still want to make scrapbook layouts. I still shop for supplies. I just…haven’t done it.

But! I have quilted a ton. I’ve got all my scraps managed and organized. I am almost done with the quilt I’m making for Jake and then I can start the one I’m making for Kaleb. I am actually, finally sewing together all the billion half-square pink and black triangles I’ve made over the past 7 or 8 years. (I’m trying to decide…is 90x90 too big for a quilt that won’t be used on a bed? I just have so many squares I love. And I live with tall people. But on the other hand: How much will a 90x90 quilt weigh once I back it (with minky!) and add batting? Will it even be useful or just a big pain in the butt?

July has not been a great reading month for me. I’m stuck in a book with characters I like and am interested in…but the story is moving so slowly I keep putting it down for other things. But I don’t want to not finish it because I want to know what happens to them all! Maybe I need another sick day just to get through it. I am also re-reading the novel Contact, which I read about 18 times as a teenager. I was a little bit nervous about the re-read because what if my adult tastes found it lame or inane or narrow minded? But what I am discovering is just how much of my beliefs about the universe/religion/is-there-anything-after-this-life was shaped by this book. Which is really strange, but also fairly liberating.

Finally, writing. I’m continuing to work on the poem I started. There is a deadline and a place to submit so that is pushing me. I still haven’t written the perfect transition I need, but I DID dream I wrote it, and then in the dream repeated it over and over so I wouldn’t forget it when I woke up. But I don’t remember it. I want to write more—I have an essay about pie crust that’s partly formed, too.

Tomorrow I am going to write my goals for August, but right now I am going to go sit out on my back porch. I’m going to listen to the crickets and admire the scent of the summer air, which is especially delicious tonight because it rained today. I’m going to breath in this deep-summer night and try to store it up as a hedge against winter darkness.

How was your July?


Quilted Mug Rug Tutorial

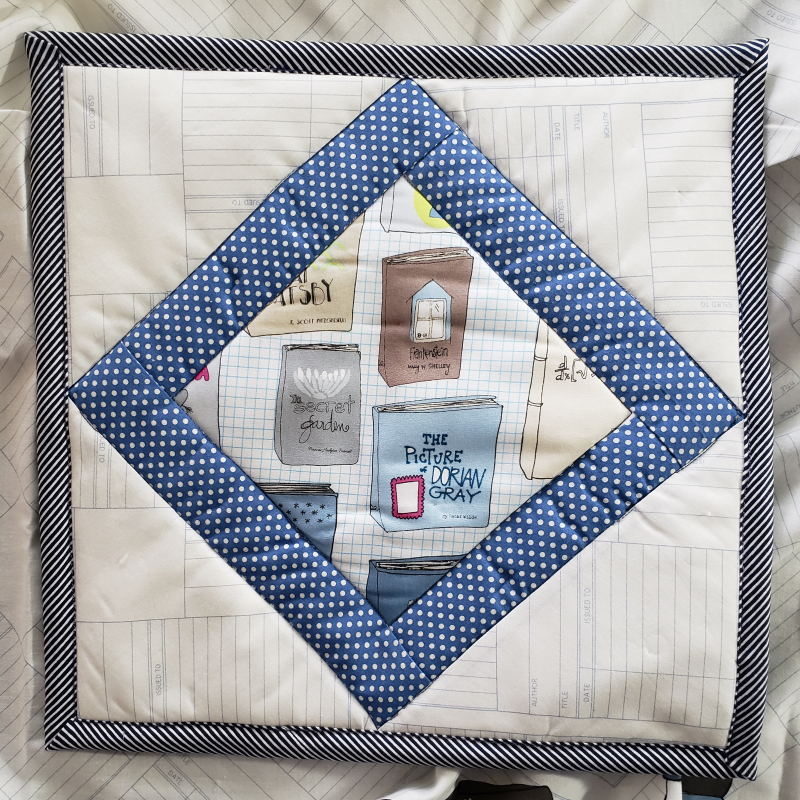
One of my very favorite librarians is leaving the library this week, and I wanted to give her a little something to remember the library by. My current favorite fabric gift to make is a little quilted square. I think of it as a mug rug, which is a small, padded object that you put under your mug or glass to protect your table surfaces from moisture rings. Recently I’ve learned that mug rugs are technically supposed to be rectangles, so you have room for your mug and a snack. So maybe it’s not technically a mug rug, but it’s a big enough square that there’s still plenty of room for a cookie. It has an insulated layer, so it can also be a hot pad.

But I’m still going to call it a mug rug.

Mug rug 01

I like giving this with a pretty mug of some sort. And the awesome thing is that it’s really quick to make. It takes about an hour and a half, which is perfect. I mean…it would take you that long to go shopping for something less personal, right? I keep a little stash of insulated batting and scraps of regular cotton batting, and they come together really quickly with just some scraps of fabric. I’ve made mug rugs in several different patterns, but this one is a recent favorite.

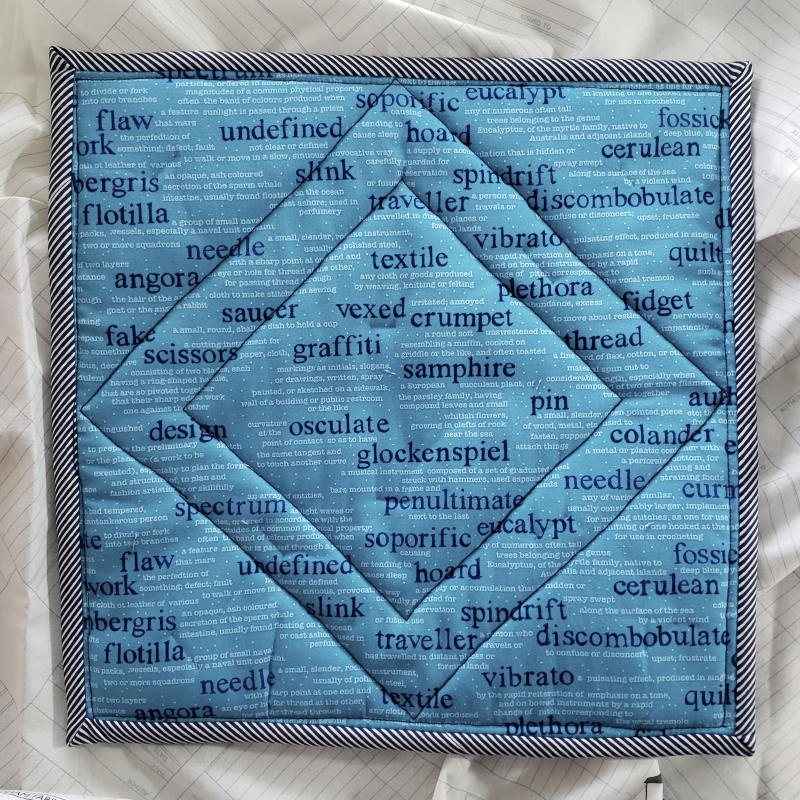
It hit me when I was just finishing the binding that I should’ve taken photos of my process, but, alas…I didn’t. But here's a photo of the back, which I might love more than the front:

Mug rug 02

What you need:

1 6.5” square, cut on point (technically, a diamond) (In my example, the book cover print)
4 10”x2” strips (the blue polka dots)
1 13” square (the library card print)
2 2.75” x width of fabric binding strips (navy diagonal stripes)
1 15” square of Insul-Bright (insulated batting)
1 15” square of cotton batting
1 15” square of backing fabric (dictionary print)

You can adjust these measurements depending on the fabric you have and how big you want to make your mug rug.

Directions:

  1. Cut the first square. This is the fabric that gives the mug rug its personality, so pick a cotton that reflects the likes of the person you’re making it for. I like to fussy cut this so that the pattern is centered or selected for something specific. I use a 6.5” square ruler to cut this square.
  2. Cut the four strips. If you can cut these on the cross grain (parallel to the selvedge) it will be a little bit easier to sew the pieced square together, because cross grain stretches less, whereas that square cut on point will have stretchy sides. If you don’t have enough fabric for cross grain strips, though, don’t sweat it.
  3. Sew the strips onto the sides of the square. I sew an edge, trim off the excess, iron, then repeat on the next side. You can also sew one on top, one on bottom, then one on each side, it just depends on your preferences.
  4. Iron and square up as needed. This is the center square.
  5. Cut the 13” square. Again consider pattern as necessary.
  6. Cut the 13” square into four triangles by cutting it in half diagonally twice, from corner to corner.
  7. Sew one corner to one side of the center square, centering it as closely as you can (but don’t worry if it’s not perfectly centered).
  8. Sew another corner to the opposite side of the center square.
  9. Iron. You’ll have some triangle flaps on each corner of the square, but just iron them with the ¼” seam flattened down.
  10. Sew another corner to the third side of the center square. Again, center as well as you can. You will sew over those triangle-shaped flaps from step nine.
  11. Sew the final corner to the fourth side.
  12. Iron. You now have a square with an on-point square in the middle. The seams will overlap at the corners of the center square.
  13. Square up the square. You want to consider if you want the corners of the center square to meet up with the binding or not (I’ve done both). For this one, I squared up so there was ½” of fabric from each corner because I wanted the binding to touch the corners.
  14. Layer. Put the backing fabric face down, then the Insul-Bright, then the cotton batting, then the pieced square, face up.
  15. Pin.
  16. Quilt. I like to keep the quilting simple, so I just quilted in the ditch around the blue strips. You can quilt however you want.
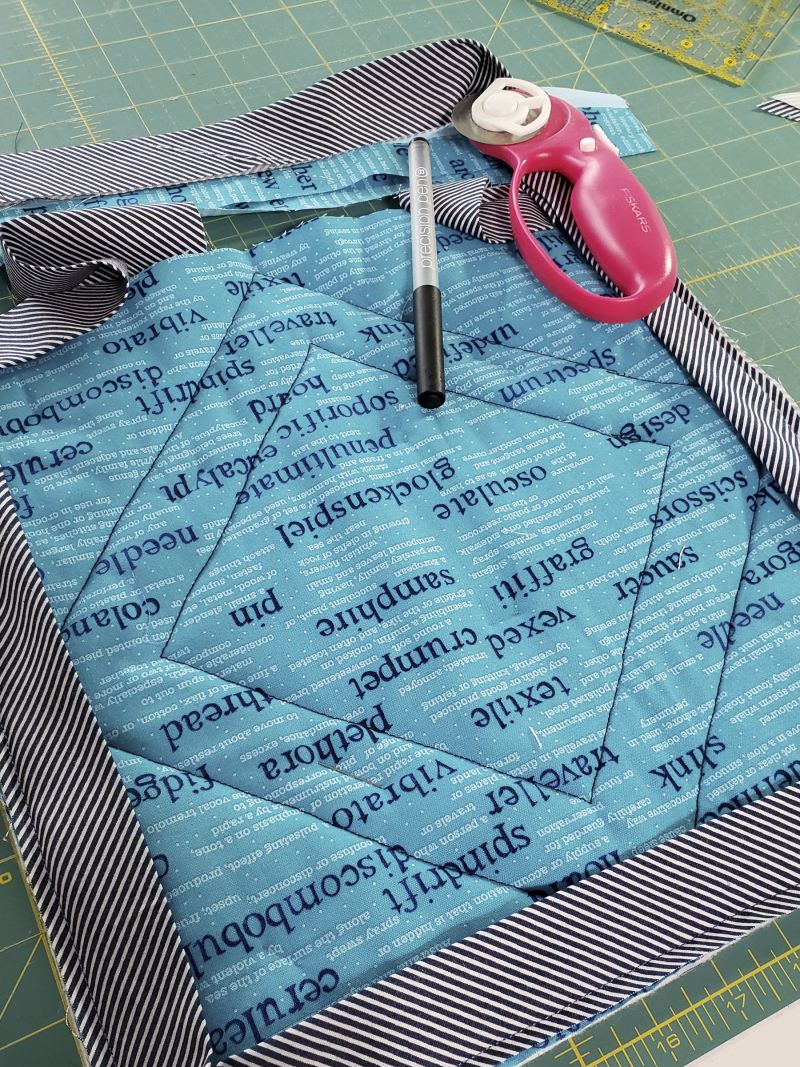
  17. Trim and bind as you wish. I sometimes self-bind my mug rugs (which means cutting the backing fabric large enough to fold it over the top), but I am really wanting to get better at binding, so I do the extra step of double-fold binding. It really doesn’t take that long because the piece is so small, and it gives you four more corners to practice on. I machine sew both sides of my bindings because I'm really bad at hand sewing.

Mug rug binding

Whenever I give someone a mug rug, I always write a little note explaining what it is. Otherwise they’re like, hmmmm, thanks for this tiny crinkly quilt! Also the washing instructions: warm water, normal dryer, and don’t put it in the microwave!

Do you have a go-to gift you like to make?


Design Tips for Rag Quilts (along with a bunch of other rambling ideas about quilting)

One of my reactions to my mom’s enormous fabric stash was the desire to finish more of my quilting projects and to share online more of what I make. The process of making something is, for me, just as fun as the actual finished object, and sharing online helps me feel like I am a part of a larger conversation. It’s a way of taking the solitary act of making out to the larger world.

(I also realized: I have many thoughts about quilting and creativity and emotional health and a happy life, and I almost never blog anymore, which probably applies to, what, 97.35% of all bloggers. But the new impulse isn’t really “blog more” but “write more,” meaning: my mother’s material horde is inspiring me to share my writing in different ways. But, I digress.)

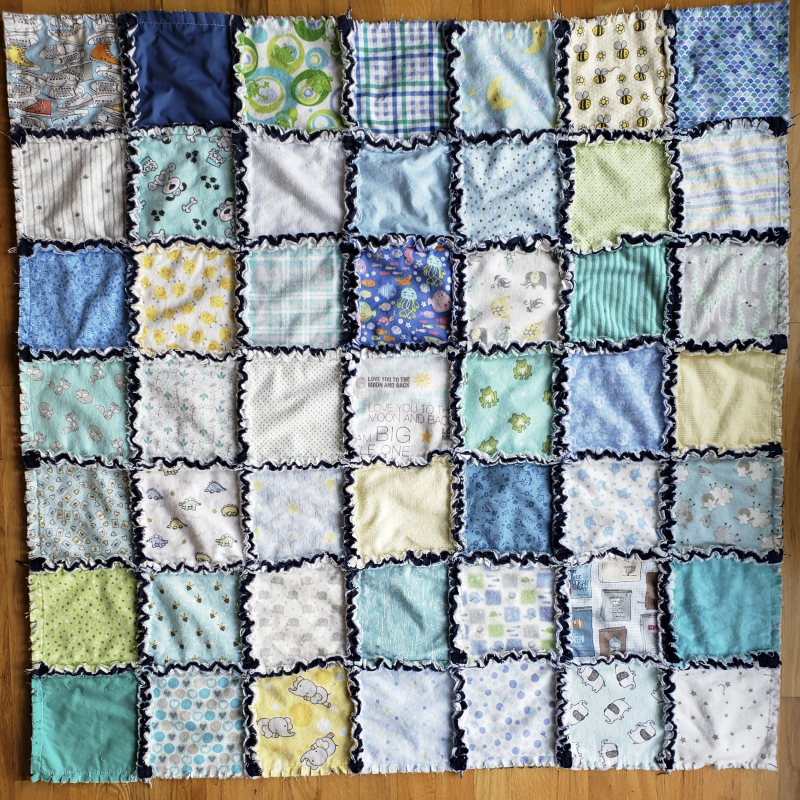
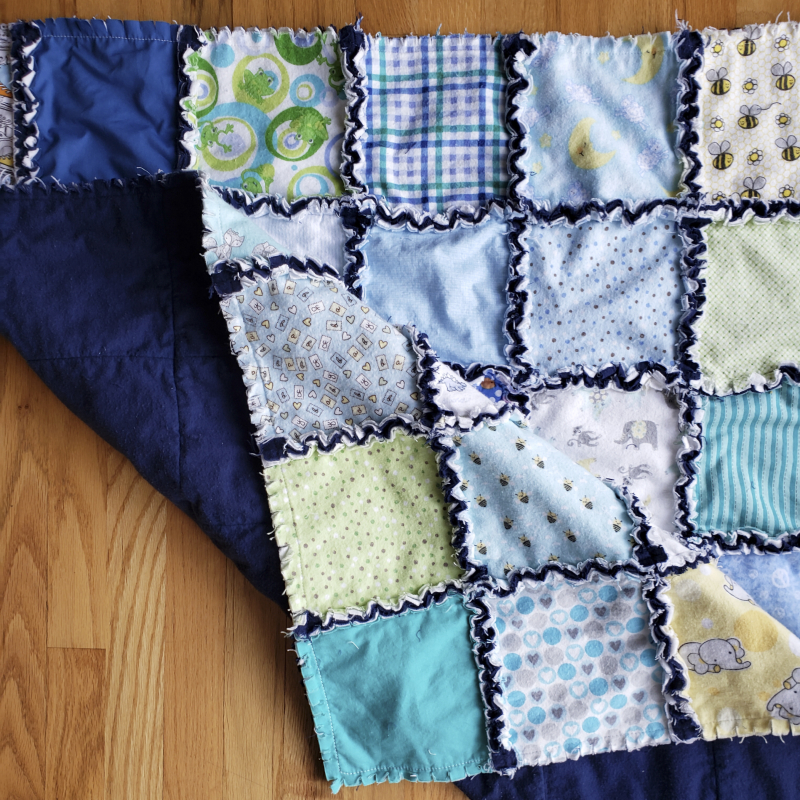
Yesterday there was a baby shower for one of my neighbor’s daughters, so I made a baby quilt. My go-to baby quilt is a rag patchwork quilt. Baby rag quilt patchwork
I know: rag quilts are great projects for beginning quilters, right? But I’ve been quilting for a long time (ever since I was pregnant with Kaleb), so why am I still making them?

  1. Rag quilts come together really quickly. The piecing and the quilting are combined into one step! Plus, you don’t have to put together the top, the batting, and the quilt back, which is my least-favorite part of the quilting process. You can actually make an entire rag quilt without even pinning, if you’re so inclined.
  2. I love working with flannel. It’s just so soft.
  3. They are versatile. I don’t think I’d attempt intricate triangles as a rag quilt, but you totally could. I’ve made rag quilts with strips, patchwork, improv, log cabin blocks. After typing that sentence, I want to try some half-square triangles in a rag quilt.
  4. Precision is not essential. I’m not sure if it’s my personality or my sewing machine, but I struggle to be completely precise. In a rag quilt, it doesn’t matter as much, because the fluffy fringe the seam creates when you wash it hides imprecision.

There are a million tutorials for how to make a rag quilt, so I’m just going to give a brief summary of the process. 1. Cut the fabric (strips, squares, whatever your pattern choice is). Cut at least TWO of each necessary shape, one for the front and one for the back. If I want the quilt to be warmer, I cut THREE of each shape: the front, the back, and then a middle “batting” piece that is almost always white flannel. Other quilters I know use a batting square for the second layer, but I’ve never made one like that. 2. Assemble the pieces into mini quilt sandwiches: back, middle (if you’re using it), front.  3. Sew the pieces by putting the BACK sides together (not the fronts, as with usual quilt tops), so the seam is on the top. Assemble into rows and then sew the rows together, always with the backs together. 4. Snip the seams. I use a pair of scissors designed to snip rag quilt seams (there are many) and since I make rag quilts often, these we definitely a good purchase for me. 5. Wash and dry the quilt. This is where the magic of the rag quilt happens. The snipped seams fluff together and create a beautiful texture.

Baby rag quilt folded

Whenever I am making a quilt, I think of a conversation I had with a friend. She said that she wanted to start quilting, but the thought of making a mistake kept her from ever making anything. It is a little bit scary when you first start, because fabric is expensive. But my quilting philosophy goes along these two lines: 1. Fabric is a flexible medium. It’s OK if it isn’t EXACT. In fact, I think the idiosyncrasies of each quilter’s different skills and knowledge add to each quilt’s beauty and uniqueness. 2. Expensive or not, it’s still just fabric. If you mess up, you might be able to fix it by changing something in the pattern or adapting that square in some way. Worst possible outcome is you have another scrap to add to your future scrap quilt. (Because, yes: collect your scraps!)

While I was making this weekend’s quilt, I thought of that conversation, but I also thought of the following tips, which are really pretty random. (I’m realizing that this post is turning into its own kind of scrappy quilt.)

Mixing fabrics. Part of my own quilting esthetic is that I love scrappy quilts. I love figuring out how to combine pieces that at first might not seem to go together. Here’s the secret: pick one thing that is the same, and then everything else can be different. Usually for me, this is color. You can have stars, stripes, hearts, flowers, frogs, dogs, and elephants all in one quilt if the colors are all the same. By “the same” I mean: a color scheme. Repetition of color unifies the disparate patterns. I like to have three colors in my color scheme. The quilt I made for yesterday’s shower was blue, green, and yellow. There are pieces of each color, and then there are other pieces that have two of each color (so, for example, a blue background with green frogs). As you select for color, make sure the tones match—for example, if you’re using pinks, try to only use all cool pink tones.

Consider your neutrals. Fabrics are either white or off-white. If you use a unified neutral, the quilt will feel balanced. Neither one is better than the other, but stick with your choice. Also consider the stronger neutrals, which are grey and brown. Grey goes with white, brown goes with off-white.

Toss in a few surprises. It might seem chaotic at first…but there really is a method to the scrappy madness. If I have fabric that repeats, I try to not put the same fabric in the same row or column. I try to spread out similar colors. And I always add one or two fabrics that break the rules slightly. In this quilt, I added a few darker squares. The tones of the dark blue squares are the same as the lighter ones, but the tint is just more intense. I also think that sea-themed piece (third row, fourth column) is a surprise because it adds just a titch of pink.

Rag-quilt-specific ideas. Use a 5/8” seam; it’s just big enough to make the ragged part fluffy without being too big. (Make sure to take this into consideration when planning how much fabric you buy.) Sew the seam intersections (where four seams meet in the corners of the squares) open or closed, it doesn’t really matter, but just be consistent. (I sew all of mine open.) Snip the corner intersections at a 90 degree angle and the rest of the seams at 45. Part of the backing will show around each square, so think of it as a sort of outline of the pattern, and choose your color accordingly. If you use a dark backing with lighter patterns on the front, wash the backing fabric first so there is less chance of the dye bleeding through. Always wash your rag quilts (any quilt, actually) with a Color Catcher the first time you wash it, just in case. When you are drying the quilt for the first time, stop the dryer often and clean out the lint trap; that first washing makes a lot of lint that’s full of little threads. Despite what I said about loving to work with flannel, it is 100% awesome to combine both flannel and regular quilting cottons in your rag quilts; it adds some different textures and besides, not every print I love is available in flannel. If you want to spend extra time, you can bind a rag quilt with double-fold French binding like you might bind a regular quilt. Or you can also just bind it by sewing a 5/8” seam around the edge and then snipping that seam as well.

Mass production. One of the keys to having a really scrappy quilt is having a lot of different fabrics. But even if you just buy fat quarters, you’ll end up with enough squares for more than one quilt. So, embrace that and do your cutting with the idea of making more than one project. Right now I have a box of 6” squares ready to make into future rag quilts, and each time I make a new quilt, I cut a few 6” squares to add to it. For this quilt, I wanted to try 7.5” squares (because one of my recent, from-my-mother acquisitions is a 7.5” ruler), so I bought a bunch of 8” strips of flannel, gathered some other larger scraps, and started cutting. I now have enough 7.5” squares to make several baby-boy quilts, and with all the cutting already done, they will come together really quickly.

Until next time, happy quilting! (Or reading or scrapbooking or running or bowling or whatever else you love to do.)


Sugar Twine Pumpkins

One year for Easter when I was a kid, my mom made our Easter baskets. They were delicate, egg-shaped things made with pastel string stiffened with sugar. She lined the opening with matching ribbon and lace, and then we had our baskets. They lasted for only two or three years—such things are hard to store—but oh, my. I loved them while they lasted. They seemed magical to me; they evoked that Eastery feeling of the freedom of spring and the happiness of seeing green again. 

The sugar-string baskets are one of the things from my childhood I wish I had a picture of.

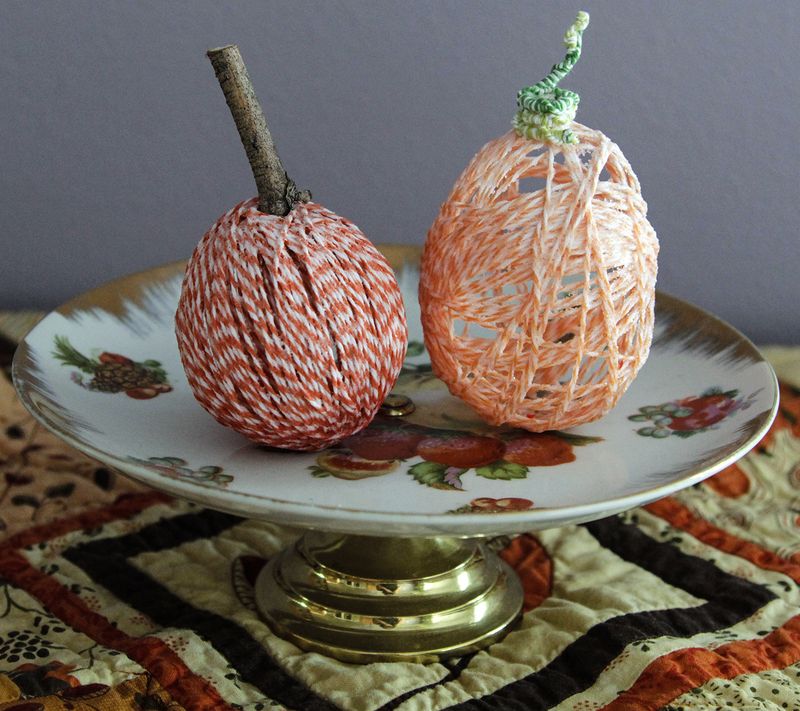
When twine (which is the same as string, except for prettier) started become a Thing in the scrapbooking world, it reminded me of the string baskets. Only I didn't want to make a basket—I wanted to make string pumpkins because as much as I love spring, I love fall even more. Especially anything orange. When my friend Monika hooked me up with some twine from The Twinery, it was time to make these:

Twine pumpkins no1

To make your own, you'll need:

  • twine or string (15 yards at least for each pumpkin; more if you want bigger ones.
  • balloons
  • hot water
  • sugar
  • assorted bits & pieces for the stem and any decoration

1. Blow up the balloons to the desired size. Don't fill them completely full; it's easier if the balloon has a little bit of give.

2. Tie a length of the twine around the tied end of the balloon in a bow.

3. Start wrapping the twine around the balloon. You can wrap it messy (like my light orange pumpkin) or more carefully (like the dark orange one), but try to cover the majority of the balloon with twine. Wrap it tight enough that it grips the balloon to stay in place. If you’re making more than one pumpkin, finish them all before moving on to the next step.

4. Boil 1 cup of water, then dissolve 3 cups of sugar in it. Stir until the sugar is completely dissolved. (I did this step in an 8-cup glass measuring cup; I just boiled the water in the microwave.)

5. Dip the twine-wrapped balloon in the sugar syrup. Drizzle it all over. You want that twine coated!

6. Tie something longer through the loops you tied in step #2. I tied a length of curly ribbon on.

7. Find somewhere you can hang the pumpkin where it can drip and not make a mess. I hung mine up by putting a heavy glass dish on top of the curly ribbon that I’d laid out in the microwave, and then I closed the microwave door. I put a cookie sheet on top of the stove top to catch the drips. (If I were not a midnight crafter I could have taken pictures but this project, as with almost all my crafty projects, was done very close to the witching hour.)

8. Let the pumpkin dry. Depending on how much twine you used, how big the balloon was, and how thick your syrup is, this will take about a day. If it’s hot outside, hang it out in the sunshine to speed up the drying time.

9. Finally! You get to do what you’ve been wanting to do all along: pop the balloon! It will make as satisfying a sound as you’ve imagined.

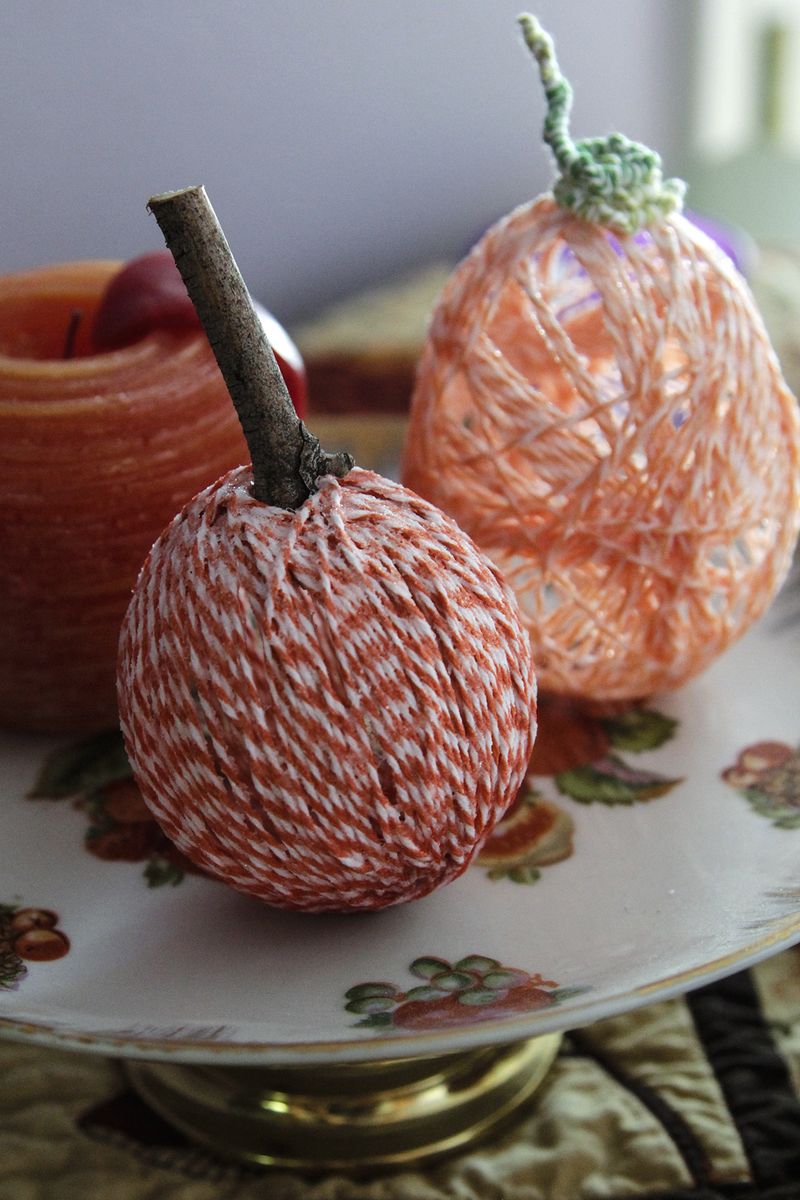
10. Fish out the guts of the shattered balloon. Cut the tied end off, along with the two loops you made in step #2. Add a stem of some sort (you can see I used a twig for one and a curled up length of friendship bracelet for the other) and some embellishments if you want. (I’m thinking my pumpkins look naked and need a few leaves, maybe. Or a bow made from a very thin ribbon. Or perhaps both.)

11. Find somewhere cute to put them! I haven't decided for sure where mine are going, but I tried them like this:

Twine pumpkins no2

with some other pumpkins and that is pretty cute. We'll see where they end up for good. My mother-in-law gave me this cake stand when she was cleaning out her house to move. She said she knew I would love it, which makes me happy because she was right. It’s just the right sort of kitschy for me.

If you make a sugar twine pumpkin (or even if you hold on to this idea and make sugar twine Easter baskets), make sure to let me know how they turn out! But in the mean time, you can check out The Twinery's twine, which is really soft & lovely, here; you can also see a layout I made using twine as the embellishment at Write Click Scrapbook today.

01 amy